How to Install WordPress: The Complete Beginner’s Guide (2026)

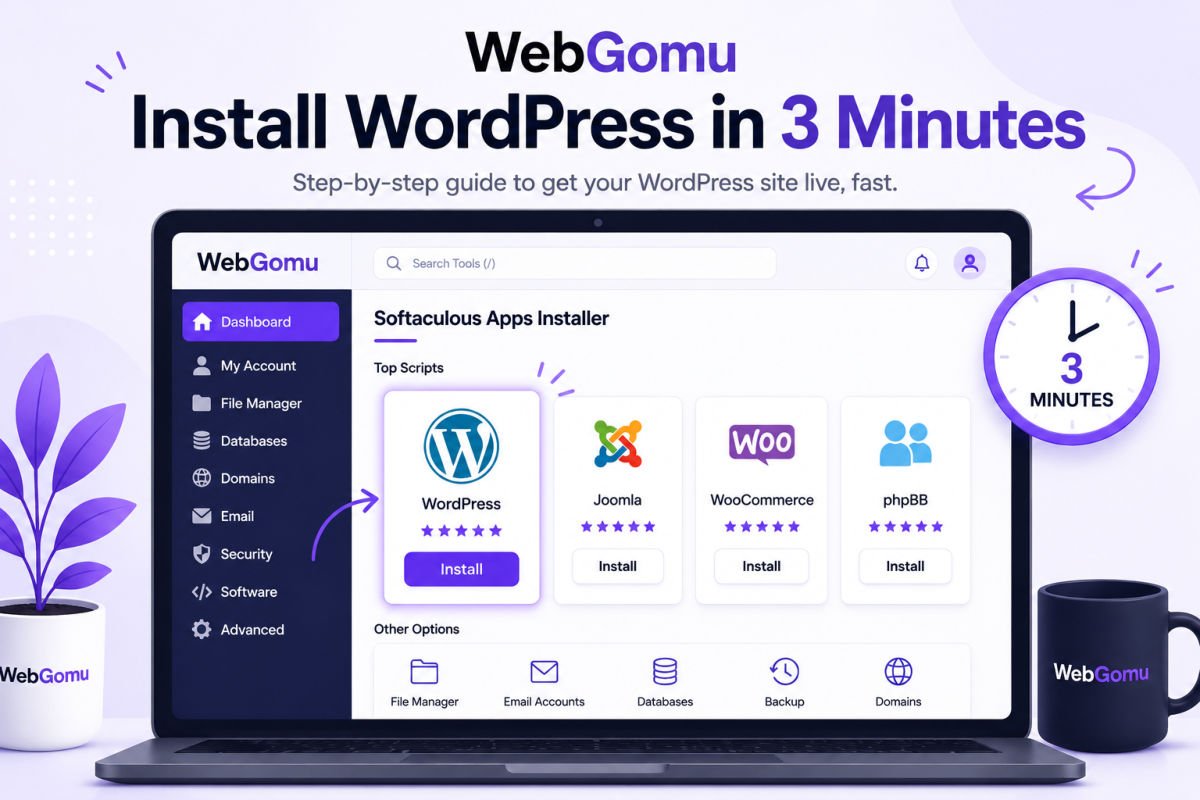
If you’ve already purchased your domain name and hosting, congratulations—you’re only a few minutes away from having a live WordPress website.
Years ago, installing WordPress involved creating databases, uploading files through FTP, and editing configuration files manually. Today, almost every hosting company has simplified the process into a few clicks, making WordPress accessible even if you’ve never built a website before.
In this guide, we’ll show you the easiest way to install WordPress using your hosting provider’s one-click installer. We’ll also explain the manual installation method for those who want to understand how WordPress works behind the scenes or whose hosting provider doesn’t include an automatic installer.
Quick Decision Framework
Use the One-Click Installer if:
- You’re installing WordPress for the first time.
- Your hosting provider offers automatic WordPress installation.
- You want the fastest and easiest setup.
- You don’t want to configure databases manually.
Use Manual Installation if:
- Your hosting provider doesn’t include an installer.
- You want to learn how WordPress works.
- You’re setting up a custom server or VPS.
- You’re troubleshooting an advanced hosting environment.
What You’ll Learn
- How to install WordPress in under five minutes using your hosting dashboard
- How to install WordPress manually if needed
- What each installation option actually does
- The settings you should configure immediately after installation
- The most common mistakes beginners make—and how to avoid them
Before You Start
Before installing WordPress, make sure you have the following:
- A WordPress hosting account. If you haven’t chosen one yet, read our guide to choosing the best WordPress hosting.
- A domain name. This is your website’s address (for example, yourwebsite.com). If you’re still deciding, see our domain name guide.
- About 15 minutes. Most beginners finish the entire process—including logging in for the first time—in less than fifteen minutes.
WebGomu Note: You don’t need to purchase your domain and hosting separately unless you want to. Most beginner-friendly hosting providers include a free domain name for your first year, making the setup process much simpler.
How Long Does It Take?
| Task | Estimated Time |
|---|---|
| Purchase hosting | 5–10 minutes |
| Install WordPress | 2–5 minutes |
| Initial WordPress setup | 10 minutes |
| Total | 15–20 minutes |
Method 1: Install WordPress Using Your Hosting Provider (Recommended)
This is the method we recommend for nearly every beginner.
Today, almost every reputable hosting company—including Hostinger, SiteGround, Bluehost, DreamHost, and Cloudways—includes an automatic WordPress installer. Instead of manually uploading files or creating databases, the hosting provider handles the technical work for you.
If this is your first website, there’s no reason to use the manual installation method. The one-click installer is faster, safer, and much less likely to result in configuration errors.
Hosting Providers That Offer One-Click Installation
| Hosting Provider | One-Click Install | Beginner Friendly |
|---|---|---|
| Hostinger | ✅ Yes | ⭐⭐⭐⭐⭐ |
| SiteGround | ✅ Yes | ⭐⭐⭐⭐⭐ |
| Bluehost | ✅ Yes | ⭐⭐⭐⭐☆ |
| Cloudways | ✅ Yes | ⭐⭐⭐⭐☆ |
| DreamHost | ✅ Yes | ⭐⭐⭐⭐☆ |
Step 1: Log In to Your Hosting Account
After purchasing hosting, your provider will send you a welcome email containing your login link and account credentials.
Sign in to your hosting dashboard. Depending on your hosting company, this may be cPanel, hPanel, or a custom control panel.
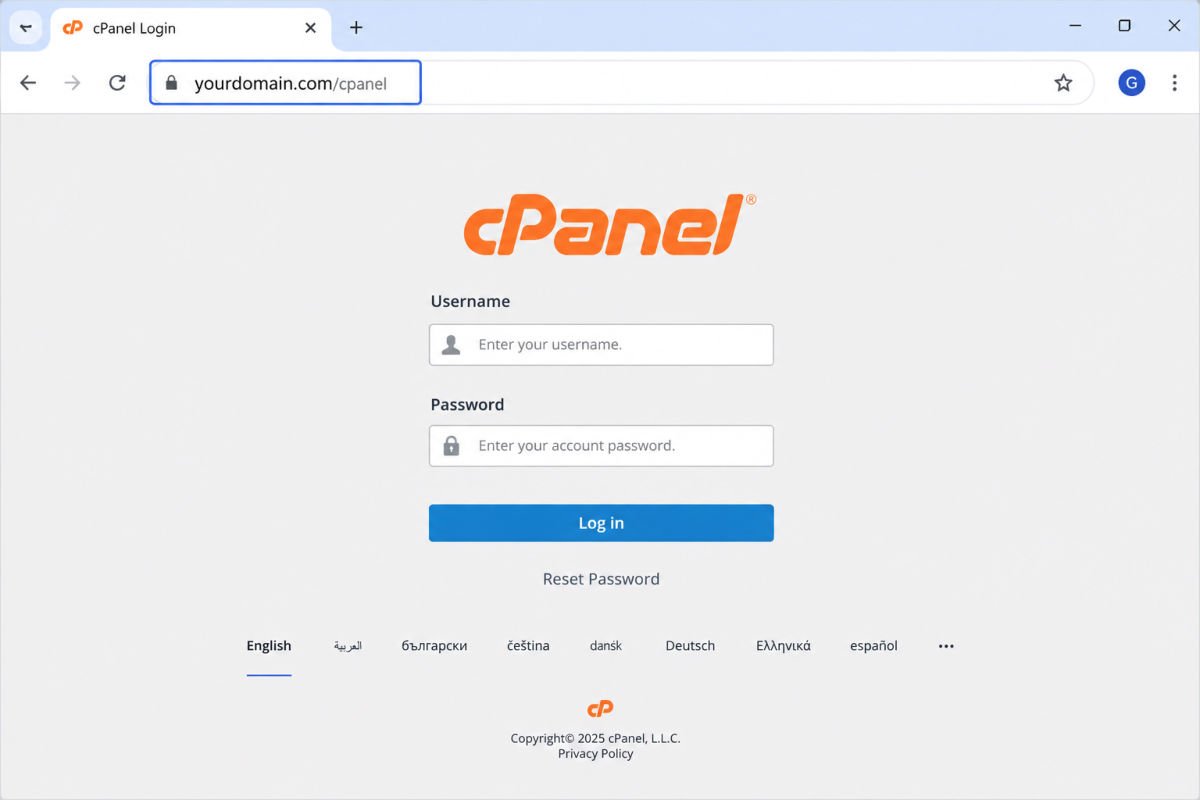
From Our Experience: Every hosting dashboard looks slightly different, but don’t worry. After installing WordPress on dozens of hosting providers over the years, we’ve found that nearly all of them follow the same basic process—the buttons simply have different names.
Step 2: Find the WordPress Installer
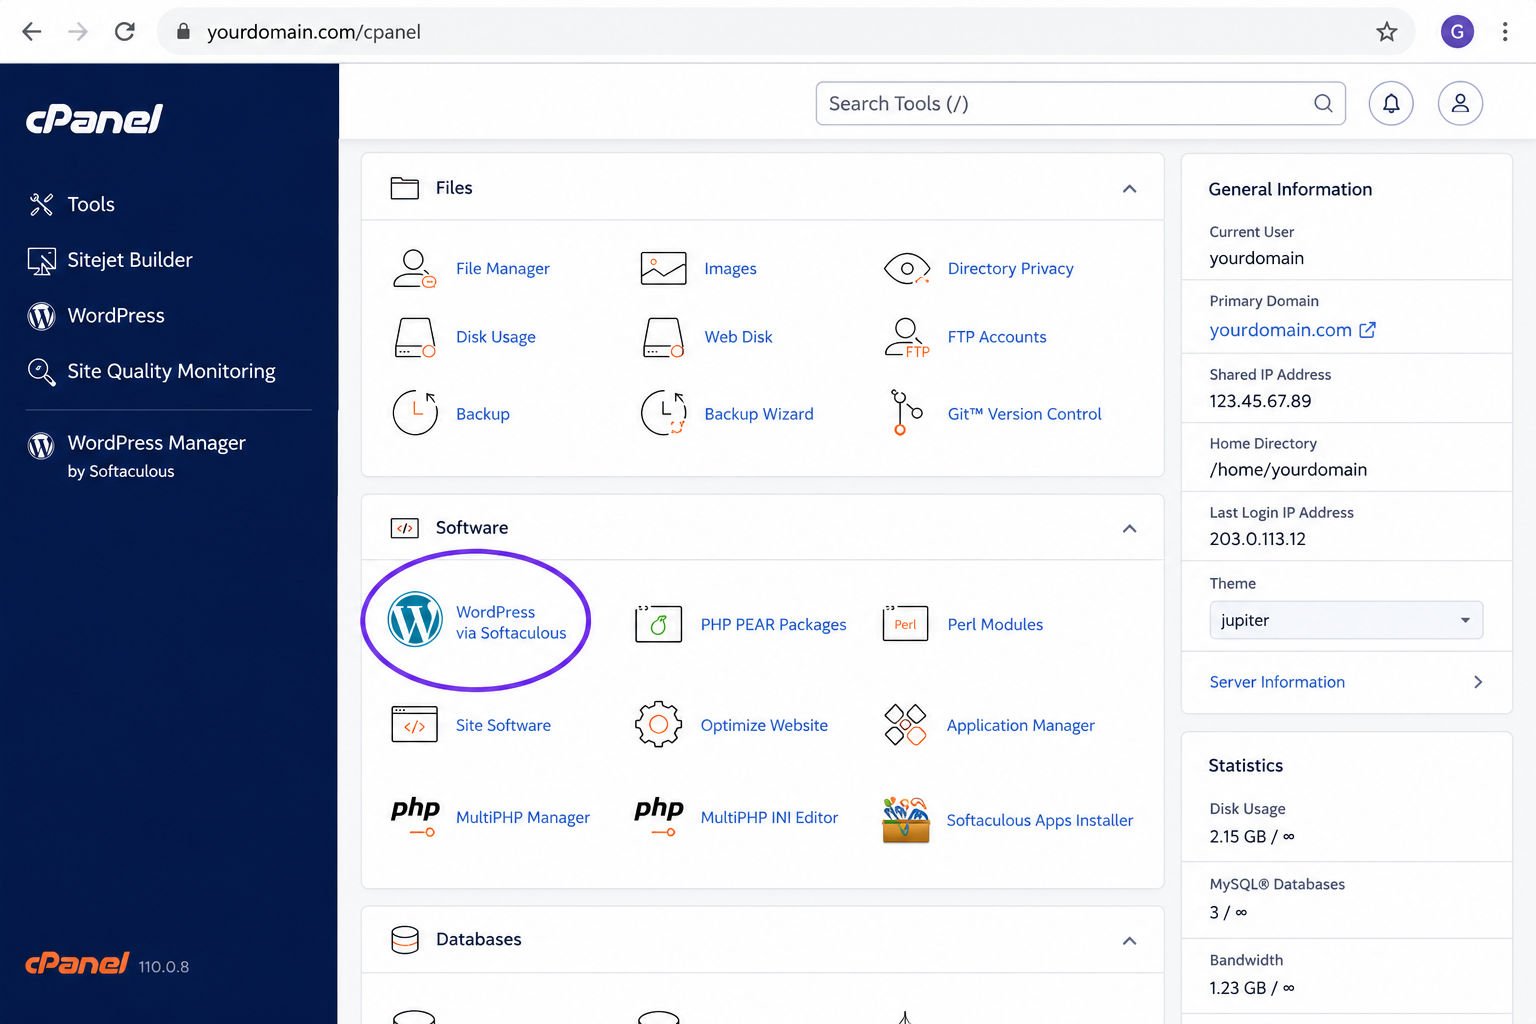
Look for a menu or button labeled one of the following:
- WordPress
- Auto Installer
- Softaculous Apps Installer
- Website
- Install WordPress
Most hosting providers place this option directly on the dashboard because it’s one of the most commonly used features.
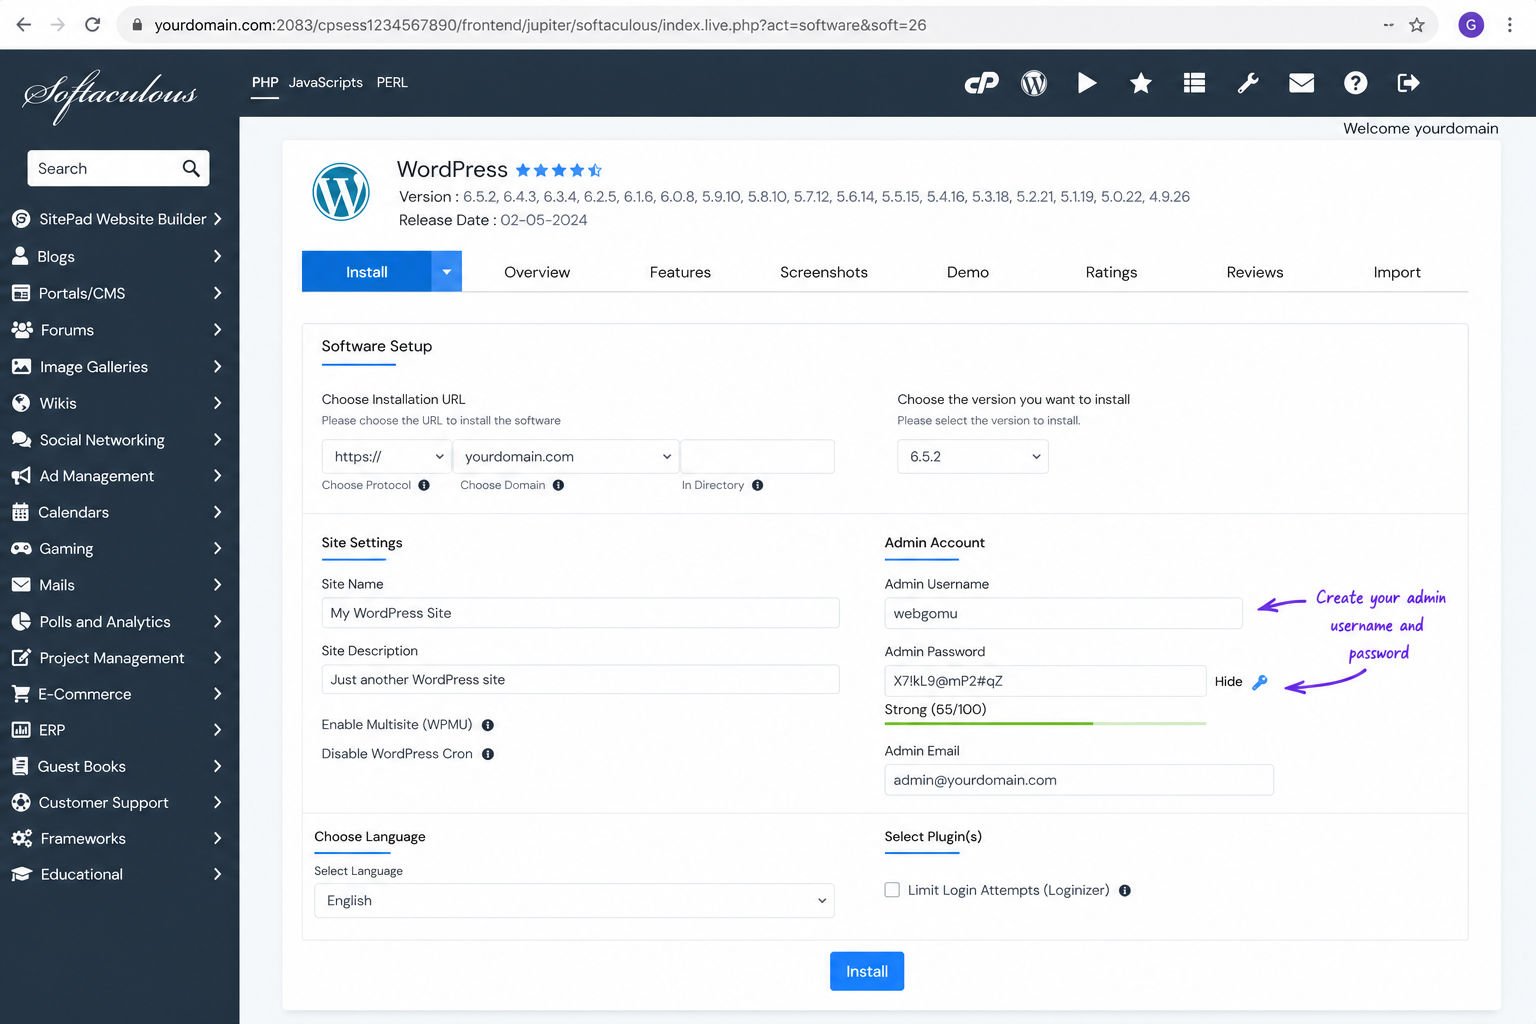
Step 3: Enter Your Website Details
After clicking Install WordPress, you’ll be asked to complete a short setup form.
- Protocol: Choose
https://if your SSL certificate is active. If you’re unsure, most hosting providers will select the correct option automatically. - Domain: Select the domain where you want WordPress installed.
- Directory: Leave this field blank if you want visitors to access your site directly from
yourdomain.com. Only enter a folder name if you intentionally want WordPress installed in a subdirectory. - Website Name: Enter your website name. Don’t worry—you can change it later inside WordPress.
- Website Description: Add a short tagline. This is also editable later.
- Admin Username: Avoid using
admin. Choose a unique username for better security. - Admin Password: Use a strong password with uppercase letters, lowercase letters, numbers, and symbols.
- Admin Email: Use an email address you regularly check. WordPress sends password resets, update notifications, and important security alerts here.
Before You Click Install
- ✅ Confirm you’ve selected the correct domain.
- ✅ Leave the Directory field blank unless you specifically need a subfolder.
- ✅ Save your administrator username.
- ✅ Save your administrator password.
- ✅ Double-check your administrator email address.
- ✅ Verify that HTTPS is selected if SSL is active.
Step 4: Click Install
Once you’ve reviewed your settings, click Install.
Your hosting provider will automatically create the database, configure WordPress, and install all the required files. The process usually takes between one and five minutes.
When it’s finished, you’ll receive two important links:
- Your website URL (for example,
https://yourdomain.com) - Your WordPress login page (usually
https://yourdomain.com/wp-admin)
WebGomu Tip: Save your login credentials in a secure password manager or another safe location. Forgetting your administrator account is one of the most common issues we see beginners run into after installation.
Congratulations! Your WordPress website is now installed and ready for customization.
Method 2: Install WordPress Manually
Although most beginners should use the one-click installer, there are situations where you’ll need to install WordPress manually.
Manual installation gives you complete control over the setup process. It requires downloading WordPress, creating a database, uploading files to your hosting account, and connecting everything together.
While it may sound intimidating, it’s actually a straightforward process if you follow each step carefully.
WebGomu Note: If your hosting provider offers a one-click installer, we still recommend using it. Manual installation is mainly useful when you’re working on a VPS, dedicated server, local development environment, or troubleshooting an installation problem.
When Should You Install WordPress Manually?
- Your hosting provider doesn’t include a WordPress installer.
- You’re installing WordPress on a VPS or dedicated server.
- You want to understand how WordPress works behind the scenes.
- You’re recovering or repairing a broken WordPress installation.
Step 1: Download WordPress
Visit WordPress.org and download the latest version of WordPress as a ZIP file.
Always download WordPress directly from the official website to ensure you’re installing the latest and most secure version.
Step 2: Create a Database
Next, log in to your hosting control panel and locate the MySQL Databases section.
Create the following:
- A new database
- A database user
- A strong password for that user
- Assign the user to the database with All Privileges
Write down the following information—you’ll need it during installation:
- Database name
- Database username
- Database password
- Database host (usually
localhost)
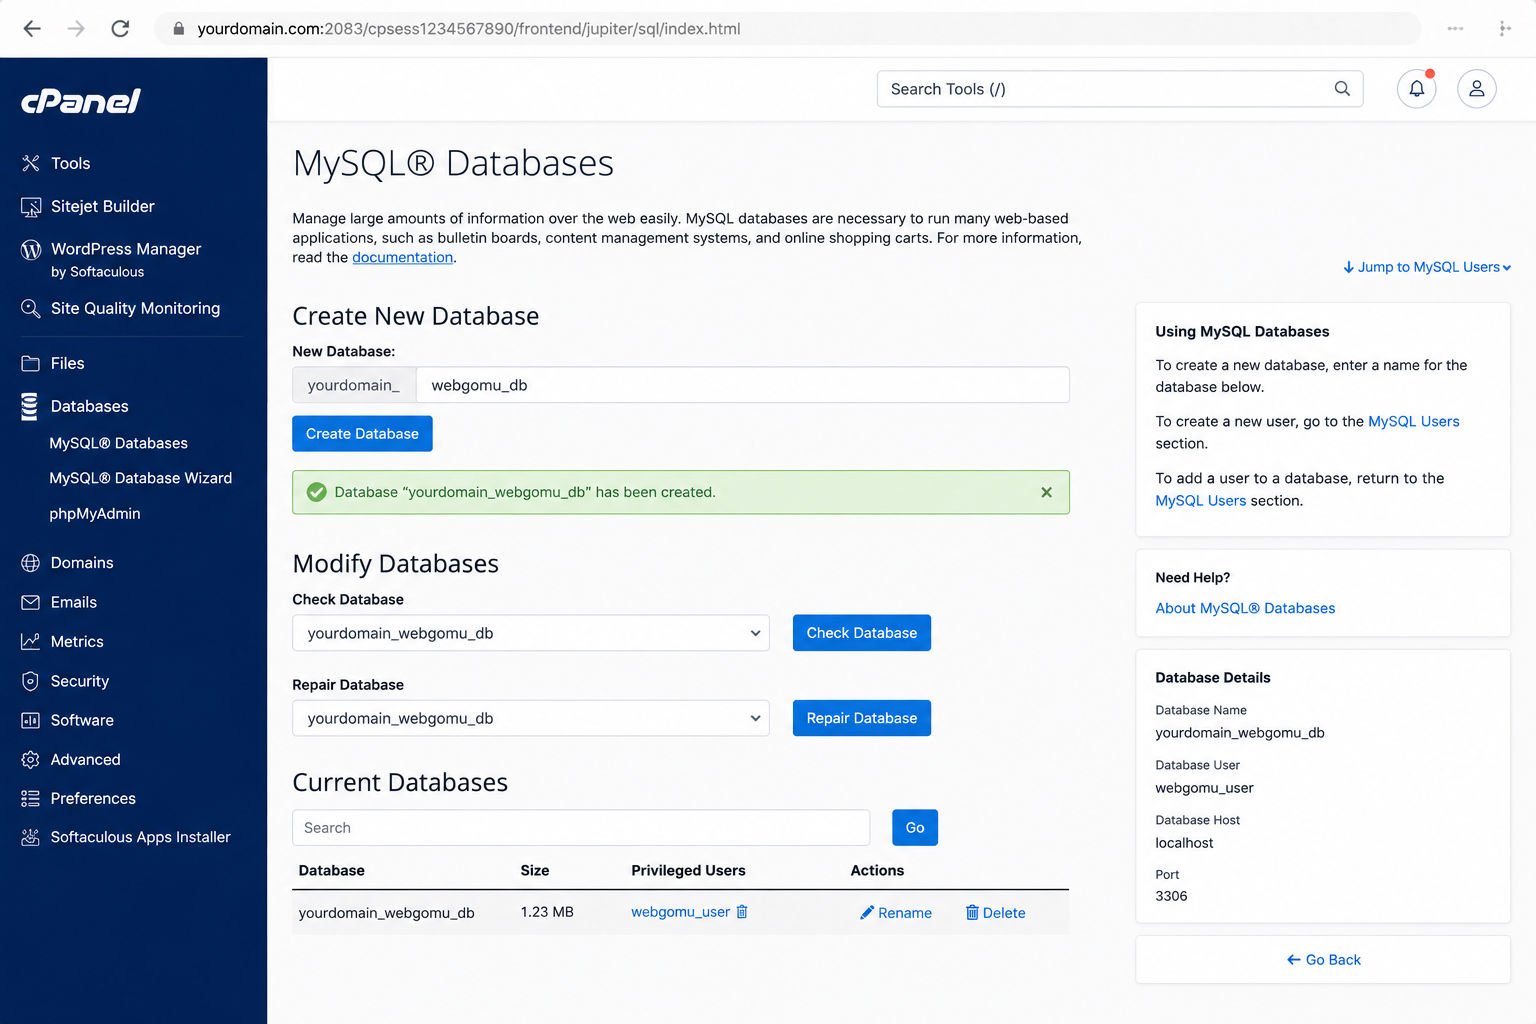
From Our Experience: Incorrect database credentials are by far the most common reason manual installations fail. Double-check every character before moving on.
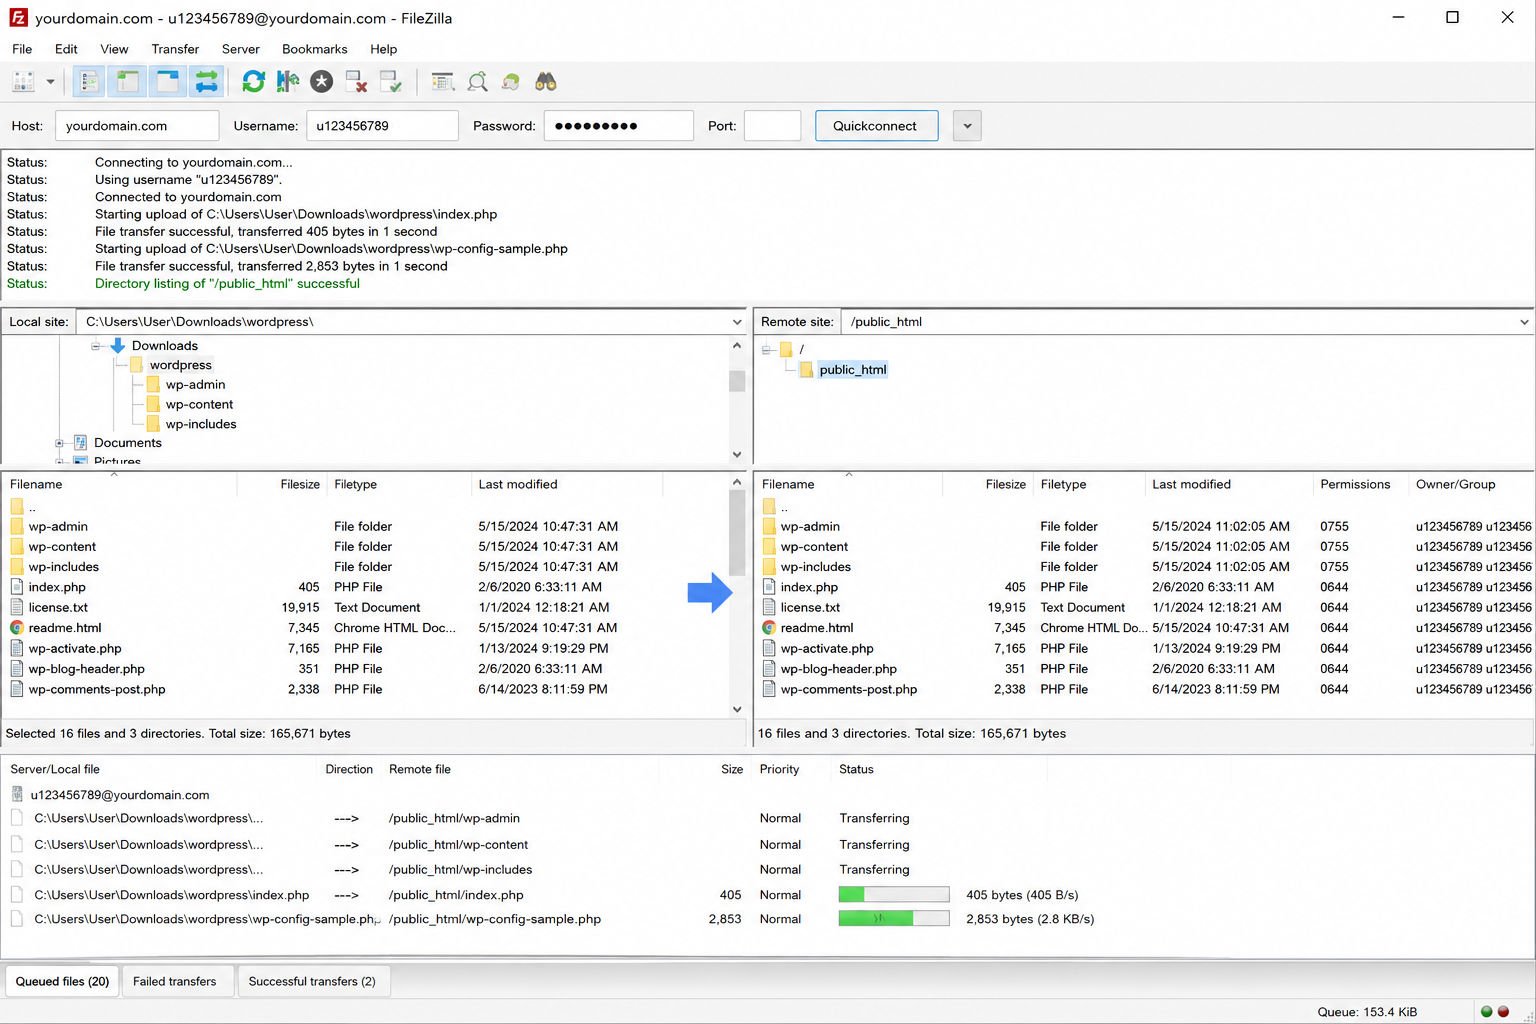
Step 3: Upload the WordPress Files
Extract the ZIP file you downloaded.
You’ll now need to upload the WordPress files to your hosting account.
You can use either:
- File Manager inside your hosting dashboard
- FileZilla (FTP)
Upload the contents of the WordPress folder into your website’s root directory, which is usually called public_html.
Step 4: Run the WordPress Installation Wizard
Open your domain name in a web browser.
If everything was uploaded correctly, WordPress will automatically detect the files and launch the famous five-minute installation wizard.
You’ll be asked to enter:
- Database name
- Database username
- Database password
- Database host
- Table prefix (leave as default unless installing multiple WordPress websites)
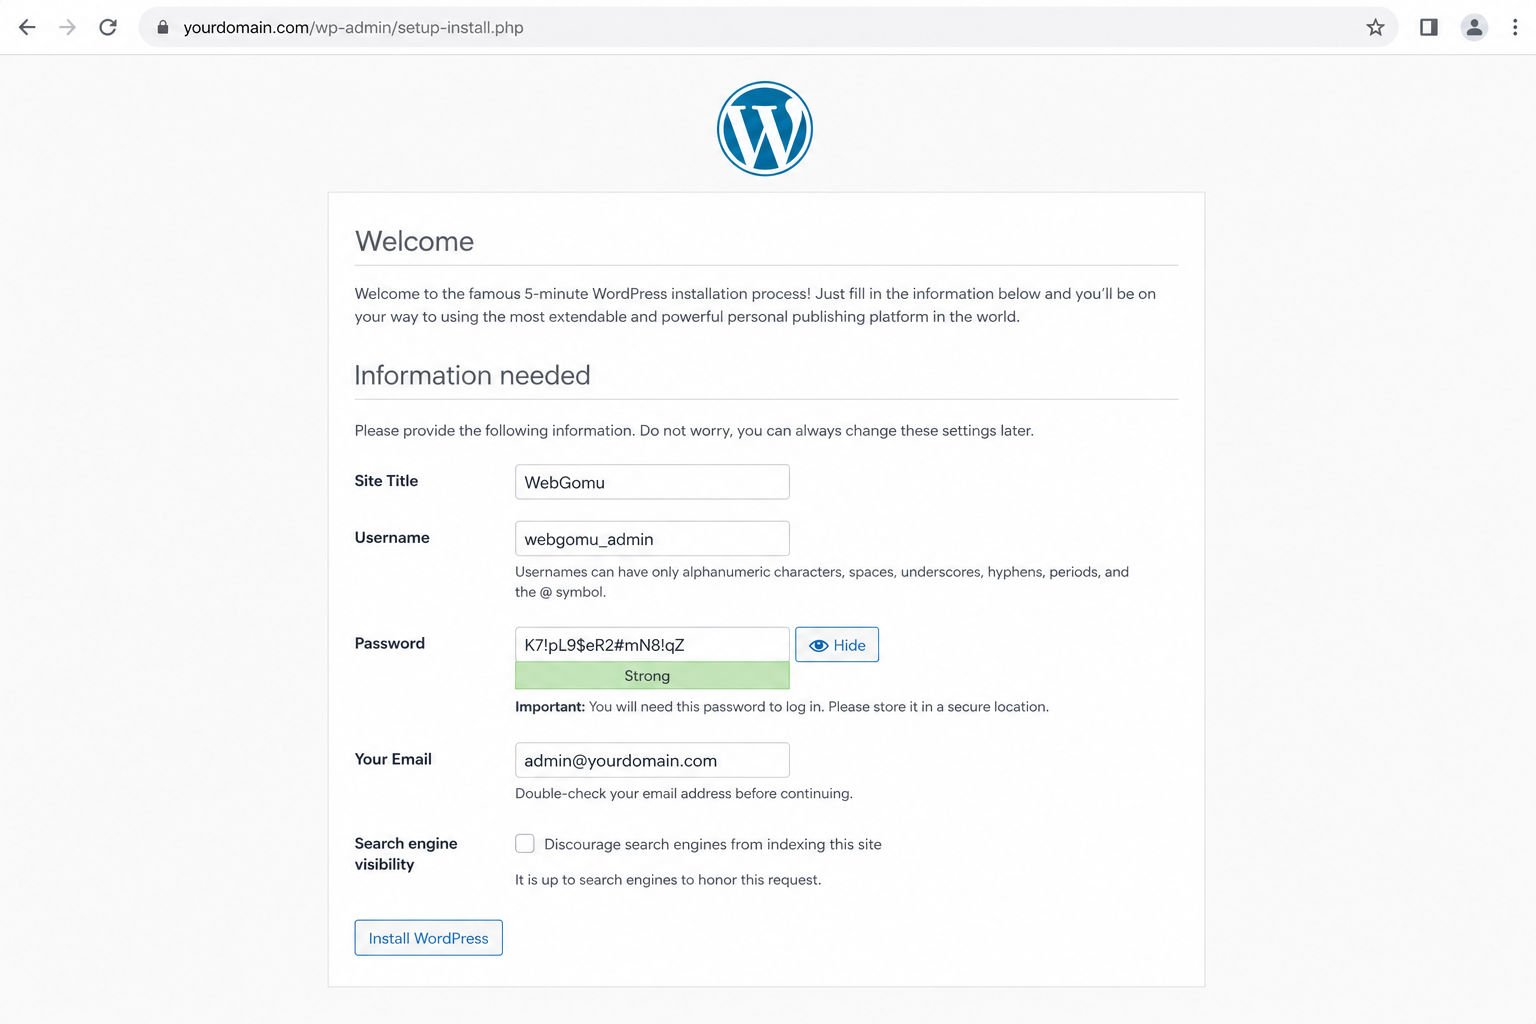
Step 5: Complete the Installation
After entering your database details, you’ll create your:
- Website title
- Administrator username
- Administrator password
- Administrator email
Click Install WordPress.
Within a few seconds, WordPress will finish installing, and you’ll be able to log in using:
https://yourdomain.com/wp-admin
Common Installation Problems (and How to Fix Them)
Even though WordPress installation is usually quick, beginners occasionally encounter problems. Fortunately, most issues are easy to fix once you know what caused them.
Error Establishing a Database Connection
This is one of the most common installation errors.
It usually means WordPress cannot connect to your database.
Check the following:
- Database name
- Database username
- Password
- Database host
- User has All Privileges
If everything looks correct, contact your hosting provider to verify the database server is running properly.
White Screen After Installation
A completely blank page usually indicates a PHP error, incompatible plugin, corrupted upload, or insufficient memory.
Try the following:
- Clear your browser cache.
- Re-upload the WordPress files.
- Increase your PHP memory limit.
- Check your hosting error logs.
Can’t Access wp-admin
If your homepage loads but /wp-admin doesn’t, check:
- Your permalink settings.
- Whether WordPress finished installing successfully.
- Your administrator username and password.
If necessary, reset your password using the “Lost your password?” link.
Your Website Shows “Not Secure”
This usually means your SSL certificate hasn’t been installed or activated yet.
Most hosting providers include free SSL certificates through Let’s Encrypt.
Enable SSL inside your hosting dashboard, then change your WordPress Address and Site Address to use https://. See our complete SSL certificate guide if you run into any trouble.
Your Site Opens at yourdomain.com/wp
This happens when WordPress was installed inside a directory instead of the root folder.
If you intended your website to load directly from yourdomain.com, reinstall WordPress and leave the Directory field blank during installation.
403 or 404 Errors After Installation
These errors are usually caused by permalink settings.
Go to:
Settings → Permalinks
Simply click Save Changes without changing anything.
This refreshes WordPress’s rewrite rules and fixes the issue in many cases.
Quick Troubleshooting Checklist
- ✅ Verify your database credentials.
- ✅ Confirm WordPress files uploaded successfully.
- ✅ Make sure SSL is enabled.
- ✅ Check that WordPress is installed in the correct directory.
- ✅ Save your permalink settings.
- ✅ Contact your hosting provider if the problem persists.
Can You Install WordPress on Your Computer First?
Yes.
Many developers install WordPress locally before publishing their websites online.
Popular local development tools include:
- LocalWP (our recommended option for beginners)
- XAMPP
- MAMP
- Laragon (Windows)
A local installation lets you experiment with themes, plugins, and layouts without affecting a live website.
WebGomu Tip: If you’re just learning WordPress, installing it on your hosting account is usually the better option. Seeing your website live online makes it easier to understand how domains, hosting, and WordPress work together.
Right After Installing WordPress: 10 Things You Should Do First
Installing WordPress is only the beginning. Before you start designing your website or writing blog posts, there are a few important settings you should configure.
Spending just 15–20 minutes on these tasks will help improve your website’s security, SEO, and overall user experience from day one.
Quick Setup Checklist
- ✅ Log in to your WordPress dashboard.
- ✅ Delete the default content.
- ✅ Configure your permalink structure.
- ✅ Verify SSL is working.
- ✅ Update WordPress.
- ✅ Choose a lightweight theme.
- ✅ Install only essential plugins.
- ✅ Create your homepage.
- ✅ Set your site title and tagline.
- ✅ Create your first backup.
1. Log In to Your WordPress Dashboard
Your WordPress dashboard is where you’ll manage every aspect of your website.
You can access it by visiting:
https://yourdomain.com/wp-admin
Bookmark this page because you’ll use it almost every time you work on your website.
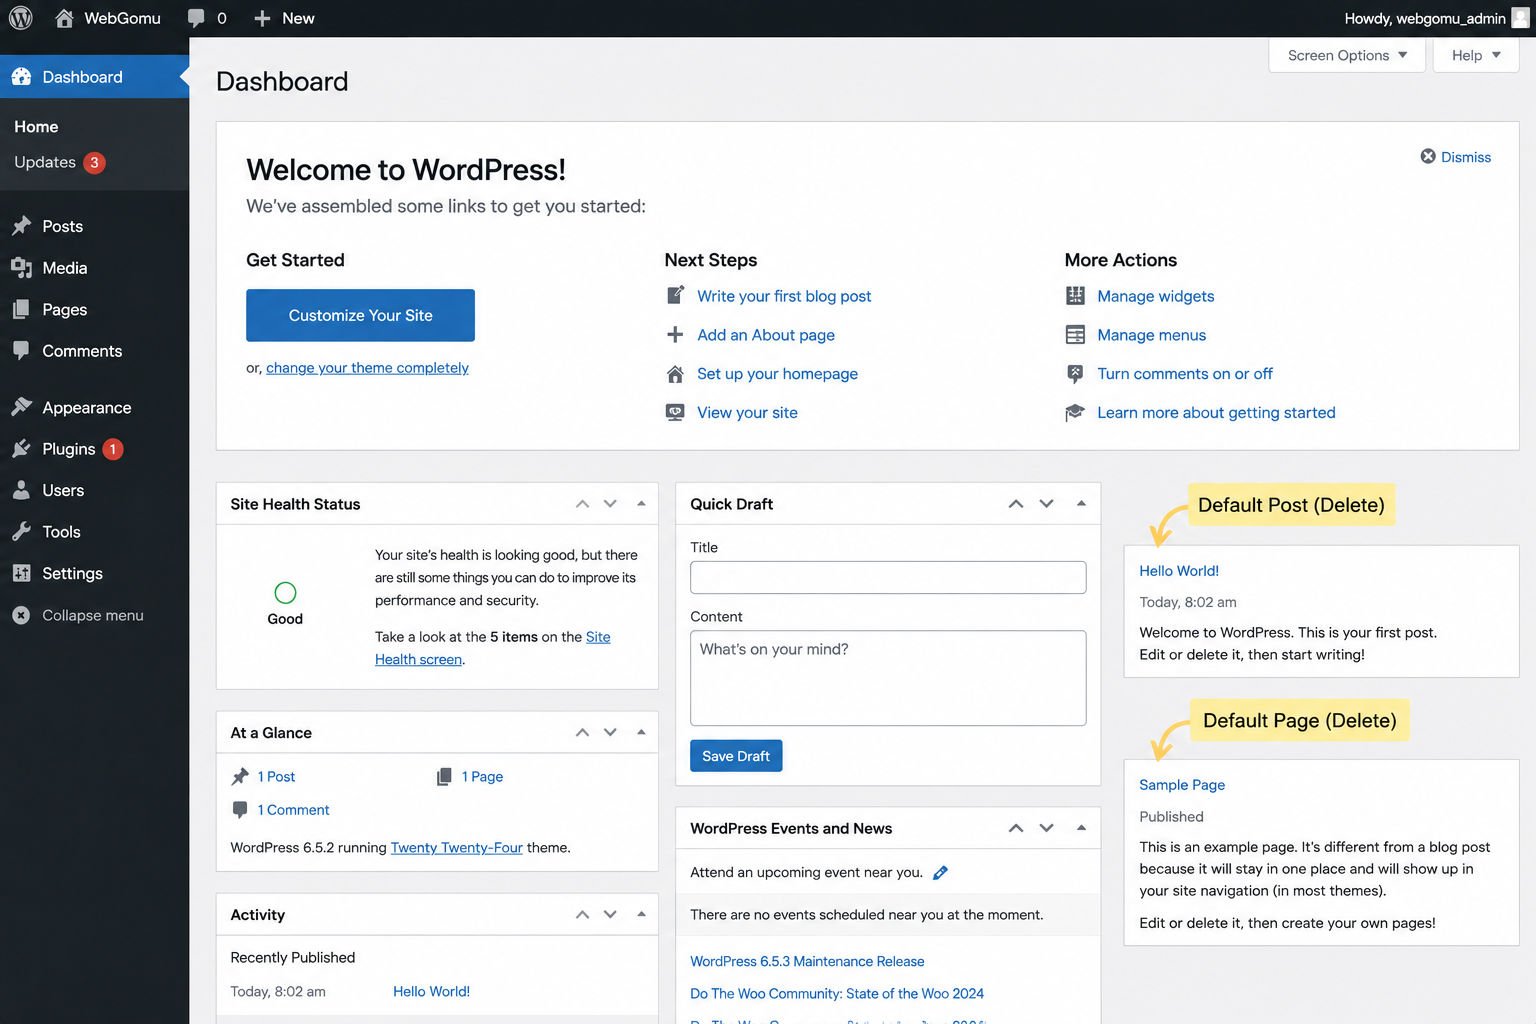
If this is your first time seeing the dashboard, don’t worry—it might look overwhelming at first.
We’ll explain every menu and setting in our WordPress Dashboard Tour.
2. Delete the Default Content
Every new WordPress installation includes sample content such as:
- Hello World post
- Sample Page
- Example Comment
These exist only to demonstrate how WordPress works.
Delete them before creating your own content to keep your website clean and professional.
3. Change Your Permalink Structure
Permalinks determine how your website URLs look.
By default, WordPress may generate URLs like:
yourdomain.com/?p=123
Instead, choose the Post Name structure to create clean, readable URLs:
yourdomain.com/how-to-install-wordpress
To change this setting:
Settings → Permalinks → Post Name → Save Changes
Why it matters: Clean URLs are easier for visitors to understand and are generally considered better for SEO.
4. Verify Your SSL Certificate
Your website should load using https:// instead of http://.
If your browser still displays “Not Secure,” activate the free SSL certificate provided by your hosting company. See our SSL certificate guide for the full walkthrough.
Most hosting providers enable SSL automatically, but it’s worth confirming before publishing your website.
5. Update WordPress
Although many hosting companies install the latest version, updates are released regularly.
Go to:
Dashboard → Updates
Install any available updates before adding themes or plugins.
Keeping WordPress updated improves:
- Security
- Performance
- Compatibility
- Bug fixes
6. Choose a Lightweight Theme
Your WordPress theme controls how your website looks and functions.
As a beginner, avoid installing dozens of themes just to experiment.
Instead, choose one lightweight, well-maintained theme and learn how to customize it.
If you’re unsure where to begin, read our guide to choosing the right WordPress theme.
From Our Experience: One mistake we see beginners make is choosing a theme based only on appearance. A beautiful theme that’s slow or poorly maintained can create problems later. Focus on speed, regular updates, and compatibility before design.
7. Install Only Essential Plugins
Plugins add extra features to WordPress.
While it can be tempting to install dozens of plugins immediately, every plugin adds maintenance and potential compatibility issues.
Start with only the essentials.
| Plugin Type | Purpose |
|---|---|
| SEO | Optimize your pages for search engines. |
| Security | Protect your website from attacks. |
| Backup | Create automatic website backups. |
| Caching | Improve loading speed. |
You can always install additional plugins later as your website grows.
8. Set Your Website Title and Tagline
Go to:
Settings → General
Update your:
- Website Title
- Tagline
- Administrator Email
- Timezone
These settings appear throughout your website and should accurately reflect your brand.
9. Create Your Homepage
If you’re building a business website or portfolio, create a dedicated homepage instead of displaying your latest blog posts.
You can change this later under:
Settings → Reading
Select:
A Static Page
Then choose the page you’d like visitors to see first.
10. Create Your First Backup
Before making major changes, create a backup of your fresh WordPress installation.
If something goes wrong later, you’ll be able to restore your website quickly.
Many hosting providers include automatic backups, but having your own backup strategy provides additional peace of mind.
Common Mistakes Beginners Make
After helping WordPress beginners for years, we’ve noticed the same mistakes appear over and over again.
Avoiding these common pitfalls will save you time and frustration.
- Using “admin” as the administrator username. This makes brute-force attacks easier.
- Forgetting to save login credentials. Store them in a password manager or another secure location.
- Installing WordPress inside a subfolder accidentally. Leave the Directory field blank unless you specifically want
yourdomain.com/wp. - Installing too many plugins immediately. More plugins aren’t always better.
- Ignoring updates. Keeping WordPress updated is one of the easiest ways to improve security.
- Skipping backups. Even brand-new websites should have a backup plan.
- Choosing appearance over performance. Fast, lightweight websites provide a better user experience than overly complex designs.
Beginner Success Checklist
- ✅ WordPress installed successfully
- ✅ SSL enabled
- ✅ Clean permalink structure
- ✅ Default content removed
- ✅ Theme installed
- ✅ Essential plugins installed
- ✅ Homepage created
- ✅ Backup completed
Recommended Tools
You don’t need dozens of tools to build your first WordPress website.
These are the ones we regularly recommend because they’re beginner-friendly, reliable, and widely supported.
| Tool | Purpose |
|---|---|
| WordPress.org | Download the latest version of WordPress. |
| Softaculous | One-click WordPress installer included with many hosting providers. |
| FileZilla | Upload WordPress files using FTP when performing manual installations. |
| LocalWP | Create a local WordPress development environment. |
WebGomu Recommendation: Most beginners won’t need FileZilla or manual installation tools. If your hosting provider includes a one-click installer, that’s the easiest and safest way to get started.
What’s Next?
Congratulations—you’ve successfully installed WordPress.
Your website is now ready to customize.
To continue building your website, we recommend following these guides next:
- WordPress Dashboard Tour
- How to Choose the Right WordPress Theme
- Essential WordPress Plugins for Beginners
- How to Install an SSL Certificate on WordPress
- The Ultimate Beginner’s Guide to WordPress
Key Takeaways
- One-click installation is the easiest and fastest method for most beginners.
- Manual installation is useful for advanced hosting environments and troubleshooting.
- Configure your permalink structure, SSL, and updates immediately after installation.
- Start with a lightweight theme and only essential plugins.
- Create backups early and keep WordPress updated to maintain security and performance.
Frequently Asked Questions
Is WordPress free to install?
Yes. WordPress itself is completely free and open source. However, you’ll still need a domain name and a web hosting account to make your website available online. Many beginner hosting plans include a free domain for the first year.
How long does it take to install WordPress?
If you’re using a one-click installer, the installation usually takes between 2 and 5 minutes. A manual installation typically takes 15 to 30 minutes, depending on your experience and hosting setup.
Do I need coding knowledge to install WordPress?
No. Most beginners never need to write a single line of code. Hosting providers include one-click WordPress installers that handle the technical setup automatically.
Should I use the one-click installer or install WordPress manually?
For almost everyone, the one-click installer is the better choice. It’s faster, simpler, and less likely to result in configuration errors. Manual installation is mainly useful for advanced users, developers, or custom server environments.
Can I install WordPress on my computer first?
Yes. You can install WordPress locally using tools like LocalWP, XAMPP, MAMP, or Laragon. This is useful for testing websites before publishing them online.
Will installing WordPress delete my existing website?
It depends on where you install it. If you install WordPress on a domain that already contains another website, it may overwrite existing files. Always create a backup before installing WordPress on an existing website.
Can I reinstall WordPress if something goes wrong?
Yes. WordPress can be reinstalled at any time. Most hosting providers also allow you to remove an existing installation and install a fresh copy through their control panel.
Can I install more than one WordPress website on the same hosting account?
Yes, provided your hosting plan supports multiple websites. Many hosting providers allow you to create several WordPress installations under a single account.
Why can’t I access my WordPress dashboard?
The most common causes are entering the wrong username or password, an incomplete installation, incorrect website URL settings, or plugin conflicts. Start by visiting yourdomain.com/wp-admin and use the password recovery option if necessary.
What is the default WordPress login URL?
In most cases, your login page is located at:
https://yourdomain.com/wp-admin
If your hosting provider uses a custom setup or you’ve installed a security plugin, your login URL may be different.
Can I change my administrator username later?
WordPress doesn’t let you rename the original administrator username directly. However, you can create a new administrator account, log in with it, and then delete the old account if needed.
What should I do after installing WordPress?
After installation, we recommend:
- Updating WordPress
- Changing your permalink structure
- Choosing a lightweight theme
- Installing essential plugins
- Creating your homepage
- Publishing your first page or blog post
Final Thoughts
Installing WordPress has never been easier. Thanks to modern hosting providers, you can launch a fully functional website in just a few minutes without touching a single line of code.
While the one-click installer is the best option for most beginners, understanding the manual installation process can help you troubleshoot problems and better understand how WordPress works behind the scenes.
More importantly, remember that installing WordPress is only the first step. A successful website also depends on choosing the right theme, installing the right plugins, optimizing your site’s performance, and publishing helpful content consistently.
From Our Experience: We’ve helped build and manage WordPress websites for years, and one lesson stands out every time—don’t rush the setup. Spending an extra 15 minutes configuring your website properly at the beginning can save you hours of troubleshooting later.
If you’re ready to continue building your website, explore the guides below to learn the next essential steps.
Continue Your WordPress Journey
Author:

Christoper Enolpe
Founder of WebGomu • WordPress Freelancer with 10+ Years of Experience
Christoper is the founder of WebGomu and a WordPress freelancer with over 10 years of hands-on experience building, optimizing, and maintaining WordPress websites. He writes practical, beginner-friendly guides based on real-world experience, covering WordPress, SEO, website performance, and AI tools to help readers build better websites with confidence.
Learn more: https://webgomu.com/about/
Get one WordPress tip every week
Start Here
The Ultimate Beginner’s Guide to WordPress (2026): Build Your First Website Without Coding
Popular Guides
Our Partner

More from the blog
WPCode Review 2026: The Safe Way to Add Custom Code
WordPress REST API Explained: A Beginner’s Guide (2026)