How to Add Google AdSense to WordPress (2026)

To add Google AdSense to WordPress, apply at adsense.google.com, install Site Kit by Google to handle site verification and ad code automatically, then wait for Google’s review, typically a few days to a few weeks. Before applying, make sure your site has genuinely original content, clear navigation, and the standard trio of About, Contact, and Privacy Policy pages, since thin content and missing pages are the most common reasons for rejection.
Before You Start
Make sure you have the following in place first:
- Genuinely original, useful content already published, not thin or scraped
- An About, Contact, and Privacy Policy page (see our essential pages guide if these aren’t live yet)
- Clear site navigation (see our menus guide)
- A Google account to apply with
AdSense is the most accessible starting point for display advertising, no minimum traffic requirement, and it’s genuinely straightforward to set up. It’s also just one of several monetization paths, see our affiliate marketing guide if you want to compare approaches. The part beginners underestimate is preparation: a site that looks legitimate, complete, and genuinely useful gets approved faster than one that technically qualifies but looks unfinished.
What You’ll Learn
- What actually improves your approval odds, beyond just having a site
- How to connect AdSense using Google’s own official plugin
- What to expect during the review process
- Realistic payout timelines and thresholds
What Actually Improves Approval Odds
There’s no official minimum post count or traffic requirement, but in practice, a few things matter:
- Genuinely original content, not thin, scraped, or copied material
- Complete core pages, About, Contact, and Privacy Policy specifically
- Clear, working navigation, so both visitors and Google’s reviewers can actually explore your site
- A reasonable content base, roughly 15-20 solid, genuinely useful posts is a common informal benchmark, though not an official Google requirement
If you’ve followed WebGomu’s phases in order, most of this is likely already in place.
Step 1: Apply for AdSense
- Go to adsense.google.com and sign in with your Google account.
- Enter your site’s URL and basic information.
- Submit your application for review.

Step 2: Install Site Kit by Google
Site Kit, the same official plugin used to connect Analytics and Search Console, also handles AdSense verification and ad code placement automatically.
- Go to Plugins → Add New Plugin, search for “Site Kit by Google,” install and activate it.
- Open Site Kit and connect the AdSense service from its dashboard.
- Follow the prompts to link your AdSense account.
Site Kit inserts the verification code and, once approved, the ad-serving code automatically, no manual theme file editing required.
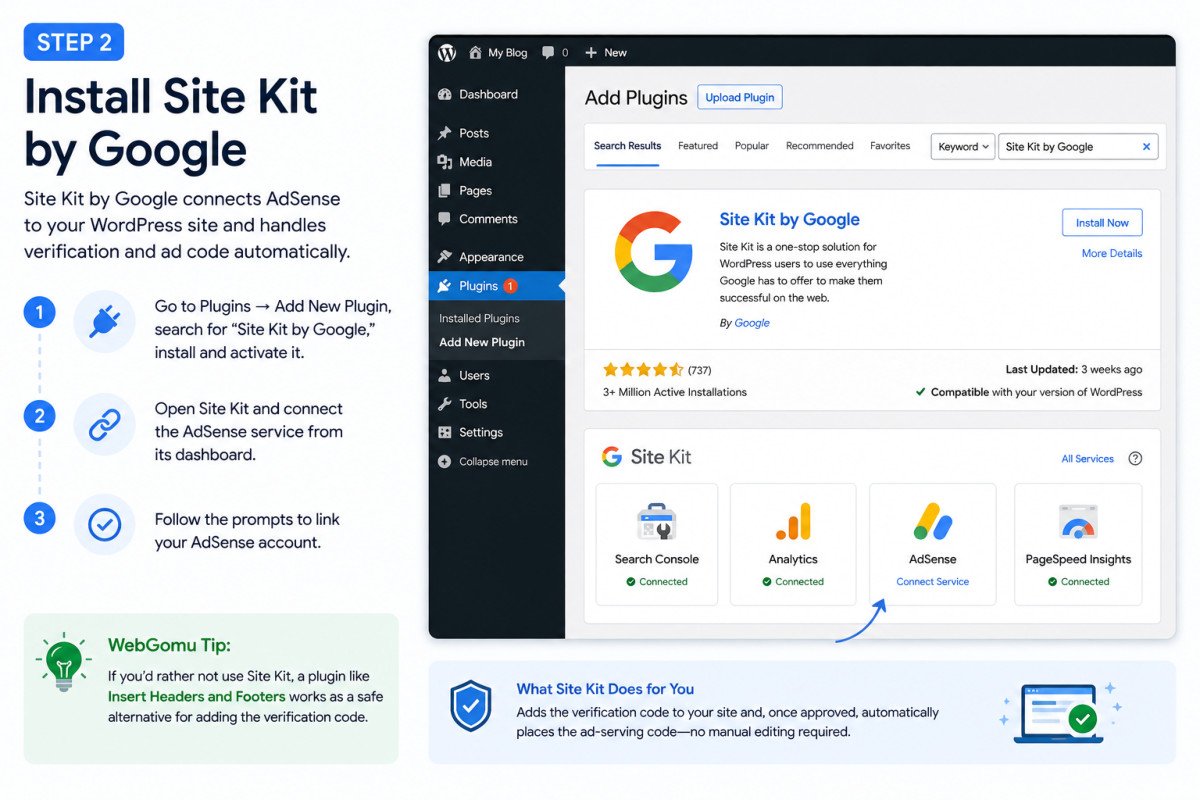
WebGomu Tip: If you’d rather not use Site Kit, a plugin like Insert Headers and Footers works as a safe alternative for pasting the verification code, it survives theme changes, unlike pasting code directly into your theme’s header file, which gets wiped out on the next theme update.
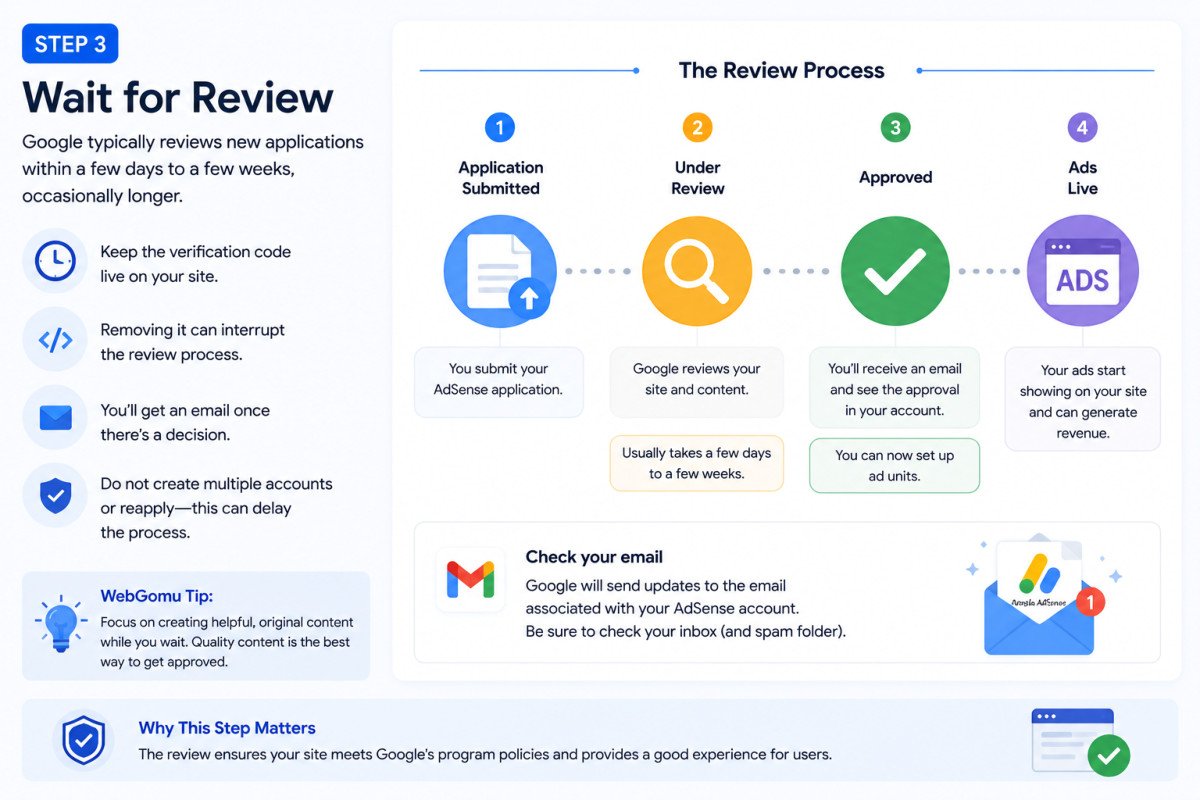
Step 3: Wait for Review
Google typically reviews new applications within a few days to a few weeks, occasionally longer. During this time, keep the verification code live on your site, removing it can interrupt the review process.
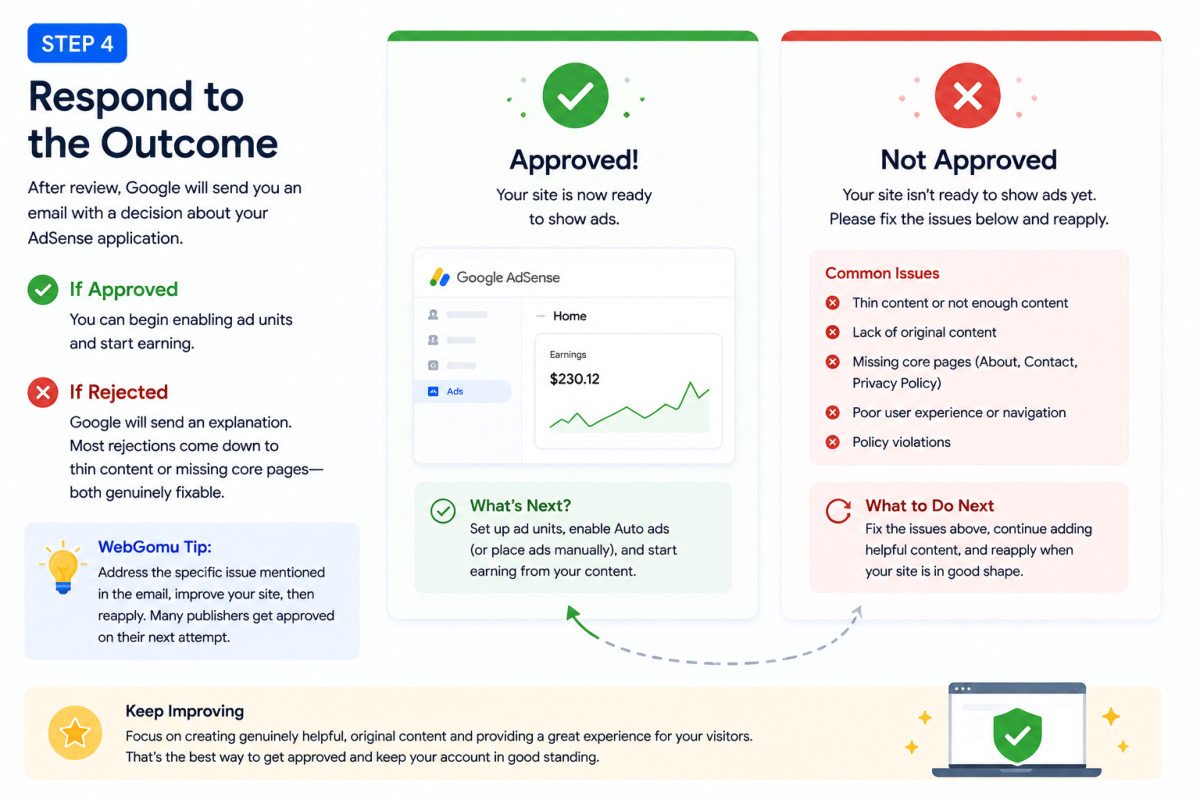
Step 4: Respond to the Outcome
If approved, you can begin enabling ad units. If rejected, Google sends an explanation, most rejections come down to thin content or missing core pages, both genuinely fixable. Address the specific issue mentioned, then reapply.
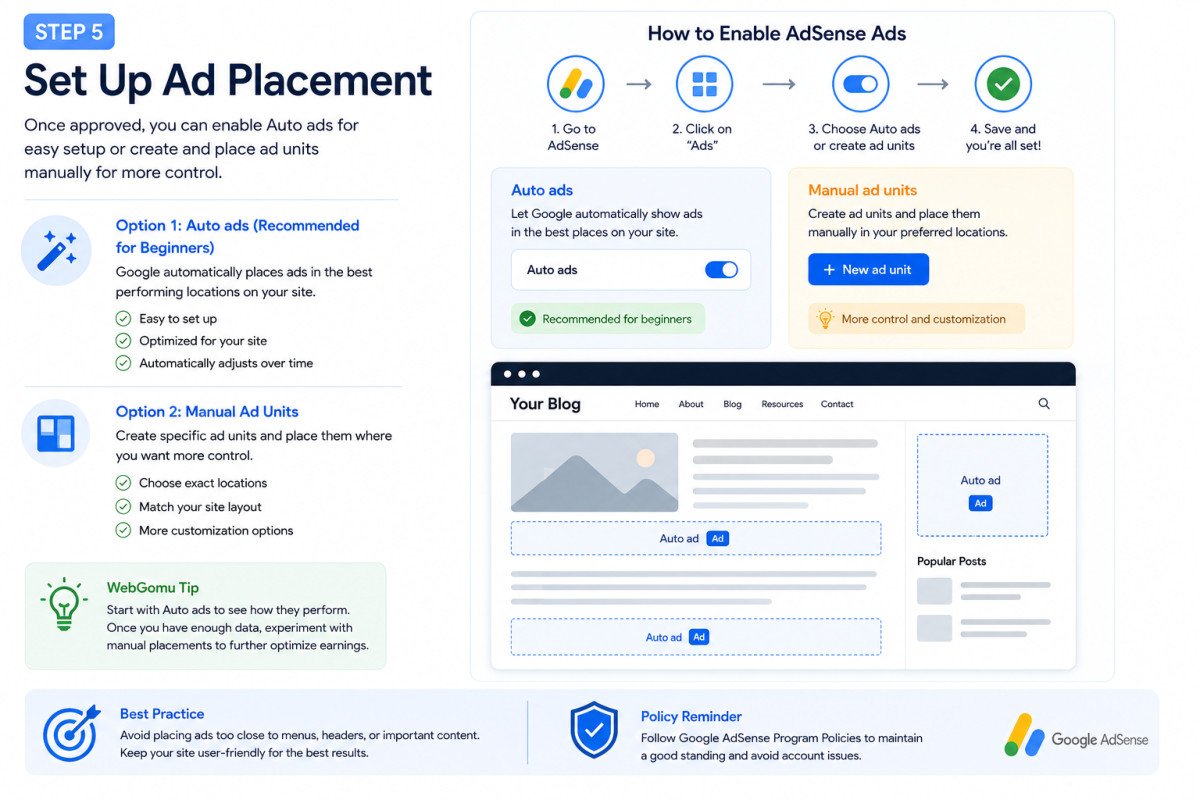
Step 5: Set Up Ad Placement
Once approved, you can enable Auto ads, which lets Google automatically place ads in reasonable positions, or manually place specific ad units where you want more control. For beginners, Auto ads is the simpler starting point.
Two Setup Methods Compared
| Method | Best For | Survives Theme Changes? |
|---|---|---|
| Site Kit by Google | Most beginners, handles everything automatically | Yes |
| Insert Headers and Footers plugin | Those who prefer a lighter, single-purpose plugin | Yes |
| Direct theme file edit | Not recommended for beginners | No, wiped out on theme updates |
Realistic Payout Expectations
AdSense requires a minimum balance, commonly around $100, before issuing a payout, processed monthly. Earnings per view vary significantly based on traffic volume, visitor location, content niche, and advertiser demand, meaningful income typically requires meaningful, consistent traffic, not just approval itself.
Troubleshooting
My application was rejected
Read Google’s explanation email carefully, it typically states the specific reason. Thin content and missing core pages are the most common, both fixable before reapplying.
My ads aren’t showing after approval
Confirm the ad code is still live on your site (don’t remove it after approval), and check whether Auto ads is enabled, or that manually placed ad units are correctly configured.
Can I use AdSense alongside other ad networks?
Generally yes, as long as the other network’s policies are compatible with Google’s guidelines. Worth checking both networks’ terms before combining them.
Common Mistakes
- Applying before core pages (About, Contact, Privacy Policy) and clear navigation are actually in place.
- Removing the verification code before or shortly after approval, which can interrupt the process.
- Expecting significant income immediately after approval, rather than building traffic first.
- Placing ads in ways that hurt readability or mislead visitors into clicking, which risks policy violations.
Recommended Tools
- Site Kit by Google — the simplest, official way to connect AdSense and handle ad code automatically
- Insert Headers and Footers — a lightweight alternative if you’d rather not use Site Kit
Key Takeaways
- There’s no official minimum traffic requirement, but content quality and complete core pages genuinely matter.
- Site Kit by Google is the simplest setup method, handling verification and ad code automatically.
- Review typically takes a few days to a few weeks, rejections are usually fixable.
- Meaningful income requires meaningful traffic, approval alone isn’t the finish line.
Frequently Asked Questions
Do I need a minimum amount of traffic to get approved for AdSense?
There’s no official minimum, but organic traffic and genuinely useful, original content meaningfully improve approval odds.
How long does AdSense approval take?
Typically a few days to a few weeks, occasionally longer, depending on how thoroughly Google needs to review your site.
Why was my AdSense application rejected?
The most common reasons are thin or insufficient content, and missing core pages like About, Contact, or Privacy Policy. Google’s rejection email specifies the reason.
How much money can I expect from AdSense?
It varies significantly based on traffic volume, visitor location, niche, and advertiser demand. Google’s AdSense earnings calculator can provide a rough estimate, though actual results vary.
When does AdSense actually pay out?
Once your balance reaches the minimum threshold, commonly around $100, payments are processed monthly.
Resources Links
Author:

Christoper Enolpe
Founder of WebGomu • WordPress Freelancer with 10+ Years of Experience
Christoper is the founder of WebGomu and a WordPress freelancer with over 10 years of hands-on experience building, optimizing, and maintaining WordPress websites. He writes practical, beginner-friendly guides based on real-world experience, covering WordPress, SEO, website performance, and AI tools to help readers build better websites with confidence.
Learn more: https://webgomu.com/about/
Get one WordPress tip every week
Start Here
The Ultimate Beginner’s Guide to WordPress (2026): Build Your First Website Without Coding
Popular Guides
Our Partner

More from the blog
How to Sell Online Courses with WordPress (2026)

Membership Sites on WordPress: How to Get Started (2026)