How to Install an SSL Certificate on WordPress (2026 Guide)

Most WordPress hosts include a free SSL certificate through Let’s Encrypt or AutoSSL. Log in to your hosting control panel, find the Security or SSL/TLS section, and activate it for your domain. Then update Settings → General in WordPress so your site URLs use https://, and install the Really Simple SSL plugin to handle the full-site redirect and fix any mixed content warnings automatically.
Before You Start
Make sure you have the following in place first:
- A registered domain name properly connected to your hosting
- Access to your hosting account’s control panel (cPanel or similar)
- Administrator access to your WordPress dashboard
If your site’s address bar shows “Not Secure” instead of a padlock, visitors notice, and so does Google. HTTPS is no longer optional in 2026. It affects trust, SEO, and whether sensitive information (like a login or a contact form submission) is actually protected in transit.
The good news: for most hosts, this is a genuinely quick fix.
What You’ll Learn
- What SSL actually does, in plain terms
- How to activate a free SSL certificate through your host
- How to update WordPress to fully use HTTPS
- How to fix the most common “still not secure” errors
What SSL Actually Does
An SSL certificate encrypts the connection between your website and a visitor’s browser. Without it, data like passwords or contact form submissions travels in a way that could potentially be intercepted. With it, your site loads as https:// with a padlock icon, telling both visitors and search engines that the connection is secure.
Free vs. Paid SSL Certificates
| Type | Best For | Renewal |
|---|---|---|
| Free (Let’s Encrypt / AutoSSL) | The vast majority of beginner and business sites | Every 90 days, usually automatic |
| Paid SSL | Sites needing extended validation or specific compliance requirements | Typically annual |
For most WebGomu readers, a free certificate through your host is genuinely sufficient. Paid SSL mainly matters for larger organizations with specific compliance or validation needs.
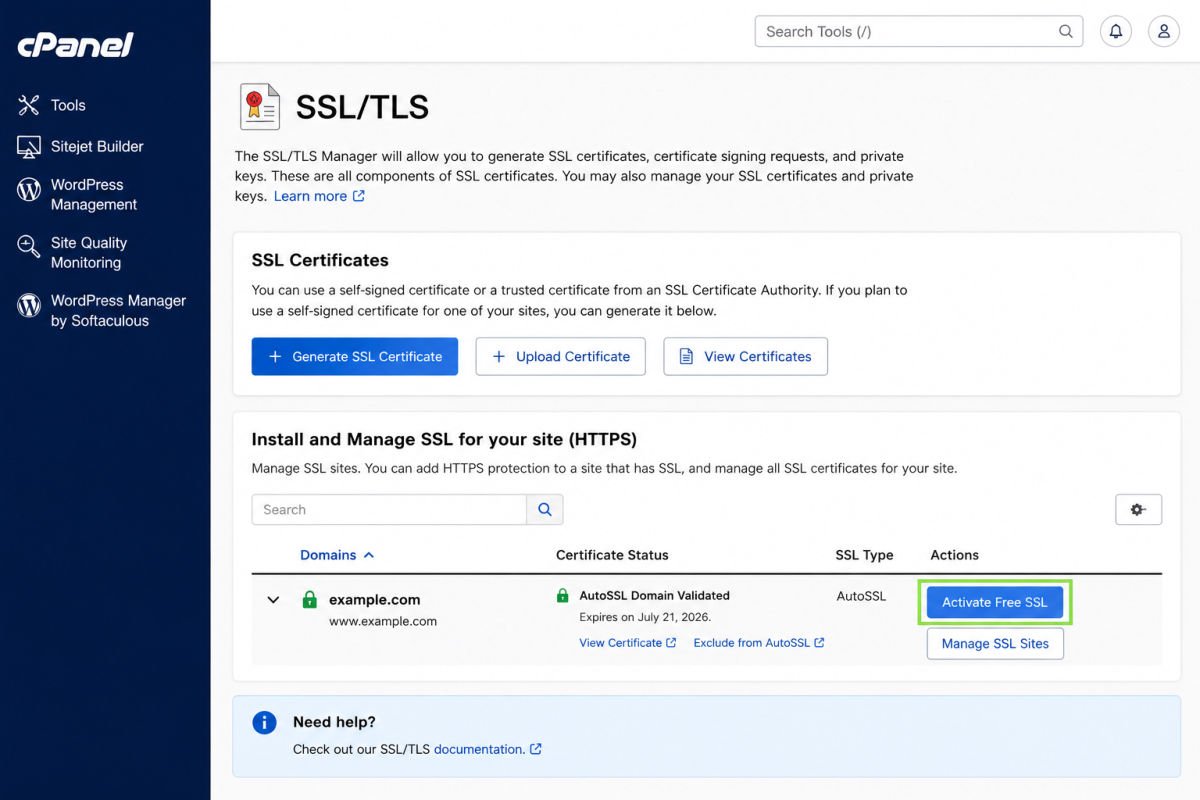
Step 1: Activate SSL Through Your Host
- Log in to your hosting account and open your control panel (cPanel or your host’s dashboard).
- Find the Security or SSL/TLS section.
- Select your domain and click Activate or Enable Free SSL.
- Wait for activation. Free certificates are usually active almost immediately, though it can occasionally take a short while to fully propagate.
Step 2: Update WordPress to Use HTTPS
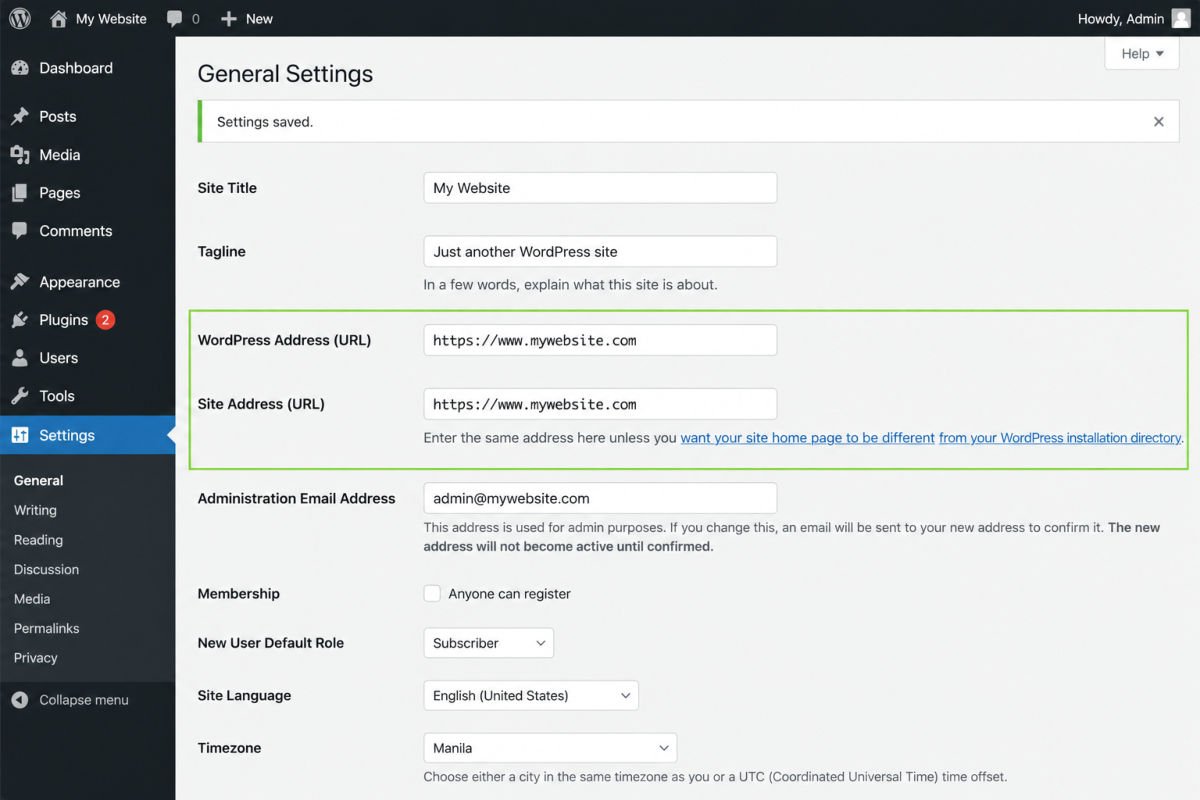
- In your dashboard, go to Settings → General.
- Update both the WordPress Address (URL) and Site Address (URL) fields to start with https:// instead of http://.
- Click Save Changes.
Step 3: Install Really Simple SSL to Handle the Rest
Updating the URL settings alone doesn’t always catch everything. Older internal links, images, or embedded content can still point to http://, causing “mixed content” warnings even after SSL is active.
- Go to Plugins → Add New Plugin, search for “Really Simple SSL,” and install and activate it.
- Follow its setup wizard, which automatically forces HTTPS and fixes most mixed content issues.
WebGomu Tip: Free SSL certificates through Let’s Encrypt typically renew automatically every 90 days, but auto-renewal isn’t always enabled by default on every host. Check your control panel’s SSL settings once to confirm it’s turned on, so your certificate doesn’t quietly expire later.
Step 4: Test It
Visit your site and confirm the address bar shows https:// with a padlock icon, and no warning message. For a deeper check, run your domain through SSL Labs’ free SSL test to confirm your configuration is fully valid.
Troubleshooting
My site still shows “Not Secure” after installing SSL
This is usually caused by some pages still loading resources over http://. Running Really Simple SSL typically resolves this automatically. If the issue persists, a plugin like Better Search Replace can help update any remaining hardcoded http:// links in your content.
My SSL certificate expired
Check your host’s SSL/TLS settings to confirm auto-renewal is enabled. Free Let’s Encrypt certificates expire every 90 days, and renewal needs to be active to avoid a lapse.
Some visitors still see a warning even after I fixed it
Browser caching can show an outdated version for a short time after activation. Ask affected visitors to clear their cache or try an incognito window, and it typically resolves on its own within a day or two.
Common Mistakes
- Updating the WordPress URL settings but skipping the mixed content cleanup, leaving lingering warnings.
- Assuming auto-renewal is on by default without checking the host’s settings directly.
- Treating SSL as complete site security, when it only protects the connection itself, not the site from malware or hacking.
- Forgetting to test the live site after activation, missing warnings that a quick check would have caught.
Recommended Tools
- Really Simple SSL — handles the WordPress-side HTTPS cleanup automatically after your host activates the certificate
- SSL Labs’ SSL Test — free tool to verify your certificate is fully and correctly configured
SSL is one important layer of protection, not the whole picture. Pair it with the steps in our security basics guide for full protection.
Key Takeaways
- Most hosts include free SSL through Let’s Encrypt or AutoSSL, activated directly in your control panel.
- WordPress needs its URL settings updated to https:// after activation.
- Really Simple SSL handles most remaining mixed content issues automatically.
- Confirm auto-renewal is enabled so your certificate doesn’t expire unnoticed.
Frequently Asked Questions
Do I have to pay for an SSL certificate?
No. Most hosting providers include a free SSL certificate through Let’s Encrypt or AutoSSL, which is sufficient for the vast majority of WordPress sites.
How long does it take for SSL to activate?
Free certificates are usually active almost immediately after enabling them. Paid certificates can take anywhere from an hour to a full day to fully activate.
Why does my site still show “Not Secure” after installing SSL?
This usually means some pages are still loading content over http://. Installing Really Simple SSL typically resolves this by forcing HTTPS and cleaning up mixed content automatically.
Does SSL protect my site from being hacked?
No, not directly. SSL encrypts the connection between your site and visitors, but it doesn’t scan for malware or block login attacks. Pair it with a security plugin for full protection.
Do free SSL certificates expire?
Yes, Let’s Encrypt certificates typically expire every 90 days, but most hosts renew them automatically. It’s worth confirming auto-renewal is enabled in your control panel.
Resources Links
Author:

Christoper Enolpe
Founder of WebGomu • WordPress Freelancer with 10+ Years of Experience
Christoper is the founder of WebGomu and a WordPress freelancer with over 10 years of hands-on experience building, optimizing, and maintaining WordPress websites. He writes practical, beginner-friendly guides based on real-world experience, covering WordPress, SEO, website performance, and AI tools to help readers build better websites with confidence.
Learn more: https://webgomu.com/about/
Get one WordPress tip every week
Start Here
The Ultimate Beginner’s Guide to WordPress (2026): Build Your First Website Without Coding
Popular Guides
Our Partner

More from the blog
The Ultimate WordPress Speed Optimization Guide (2026)
The Ultimate WordPress Security Guide (2026)